Compulsory Basic Training (CBT) Element C
The previous element will have seen you getting hands-on with your motorcycle gaining knowledge with the various controls and safety procedures.
Element C is all about riding the motorcycle. Element C is about control of the motorcycle where you’ll be riding on-site, not on public roads and will take around 2 to 3 hours to complete.
By the end of element C, you will be competent in moving the motorcycle off and stopping, clutch control, gear changing and braking. Observational skills are taught in this element which form riding routines such as OSM and PSL – all of which are explained in this section.
You’ll continue to practice riding the motorcycle, whilst implementing your new riding skills until your trainer is satisfied that you have a good level of control and safety so that you can ride on public roads. Remember, CBT is not a test, so anything you’re unsure about, ask your trainer who’ll be happy to spend time guiding you through the process. Trainers will often demonstrate the exercise.
Riding in a Straight Line and Stopping
In order to move off, ride in a straight line and stop under control, you’ll be taught:
- Clutch control
- Changing gears
- Keeping balance
- Braking techniques
- Controls coordinating
Clutch Control
Clutch control is often one of the hardest skills for a learner rider to master. The motorcycle begins to move when the clutch engages with the engine. Known as the ‘biting point’, the skill required is to slowly allow the clutch to engage with the engine else the motorcycle can stall or move away too harshly. You’ll gain a feel for the clutch, how sensitive it is and how to control the vehicle by correctly using the bite point. This can take time and some learn faster than others. The aim of this exercise is to move the motorcycle off smoothly under control and to not stall.
Changing Gears
In this exercise, the trainer will explain and demonstrate how to change up and down through the gears. Gear changes should be made smoothly and done without the need to look down. Timing is also important, and the trainer will explain when gear changes should be made. Your site training area may limit the highest gear to 2nd or 3rd gear depending on the size of the area whilst riding. Use of all gears will be practiced whilst stationary however.
Keeping Balance
Riding a motorcycle slowly does require balance. Your trainer will explain that you must look ahead and not to look down at the front wheel or gears and this can disrupt balance and to also keep both feet on the footrests until slowing to a stop. This exercise simply requires a good deal of practice to master.
Braking Techniques
Your trainer will explain how to correctly use the brakes to control your speed and to stop the motorcycle. For maximum control, the trainer will show you how to use both front and rear brakes smoothly to control speed and to stop the motorcycle at specific marked areas on the course. Marked areas may include traffic cones or lines.
The trainer will need to see that you can successfully stop the motorcycle at a marked position, to make appropriate use of both brakes, to use them smoothly and not too late and to avoid stalling. The trainer will explain the amount of brake to apply to the front and rear in different weather conditions.
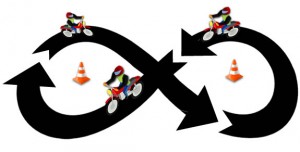
Figure of Eight Exercise
Part of compulsory basic training element C is to practice steering and balance at low speeds. A method used is to follow a figure of eight layout, typically practiced around two cones. The larger the figure of eight, the easier, so often the trainer will start of large and reduce the size of the figure of eight as you gain proficiency.
The CBT figure of 8 will test your braking skills as you’ll need to keep slow during this exercise and keep your feet off the ground and on the footrests.
CBT Emergency Stop
You’ll need to be able to stop the motorcycle quickly should an emergency arise. During this exercise the trainer will teach you how to apply the brakes in an emergency situation, how the weight transferred to the front will affect the motorcycle and the effect it will have on the tyres and road.
Your trainer will explain the differences of using individual brakes, how anti-lock braking systems (ABS) work and how to regain control in the event of a skid. Braking techniques will extend on what has already been taught with the amount of braking force that should be applied to the front and rear brakes.
The emergency stop exercise is required on the module 1 (off-road) riding test. For further information, see
Rear Observation
As a motorcyclist, you must have all-round observation in order to remain as safe as possible. In order to observe what is going on behind you and to your side, you’ll need to use the motorcycle mirrors and turning your head to look over your shoulder. Your trainer will explain how to correctly adjust your mirrors for optimal rear observation, when your mirrors must be checked and when you should physically turn your head to check behind.
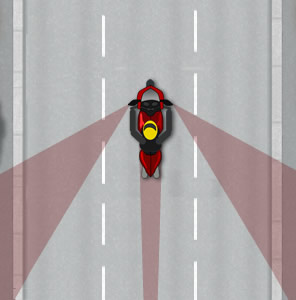
Observation to the rear and side that cannot be seen in mirrors is called the blind spots. Your trainer will explain how and when you’ll need to turn your head to see if anything is in your blind spot. Blind spots vary on motorcycles from minimal unobservable areas to large areas that cannot be observed in the mirrors. This depends on the type of motorcycle and the mirrors used. For further information on a motorcycle blind spots and those of other vehicles, see:
Indicating
Other road users and pedestrians if changing directions for your safety and theirs. When changing direction on a motorcycle, you’ll often need to use the direction indicators. Your trainer will explain when you must use your indicators and explain the correct timing to apply them and to also ensure you correctly cancel them when the manoeuvre has been completed. You’ll also be made aware of conflicting signals. A conflicting signal is when indicating isn’t necessary and in fact causes more confusion than good.
Junctions
Before taking to public roads, you’ll practice left and right turns on-site. Your trainer will explain the various types of junctions that you’ll encounter on public roads along with roads signs, road markings and traffic lights.
Routines are used to help novice rider in remembering the correct procedure. Your trainer will cover the routines:
- Observation, Signal, Manoeuvre – (OSM)
- Position, Speed, Look – (PSL)
You’ll put the skills learnt during earlier in the CBT element C to use observation, indicating in good time and correct road positioning to deal with left and right turns, major to minor roads and minor to major roads. Trainers often use on-site junction layouts for CBT candidates to practice on.
Making a U-Turn
When you’re a fully licensed motorcycle rider, you may need to turn the bike around to travel in the opposite direction. Making a U-turn is a manoeuvre you’re also going to demonstrate during the practical riding test.
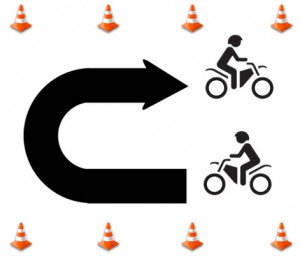
Your trainer will explain the process of making a U-turn, to perform all appropriate observations before-hand, to manoeuvre the motorcycle slowly and to keep both feet on the footrests until you reach the other side of the road. You’ll be able to practice making a U-turn until you feel confident and that your trainer is confident in your abilities. For a tutorial on making a U-turn for the motorcycle module 1 test, see:
CBT CONTINUED
After the completion of element C, element D will begin. For further reading, see: