Motorcycle Controls Explained
Compulsory Basic Training (CBT) involves your instructor teaching you the basics for motorcycle controls. A little basic knowledge before attending a CBT course is always welcome as it should make the process a little easier on the day. With that in mind, let’s take a look a look at the motorcycle controls. Explained are the essential controls that you’ll need to know, along with a diagram of where they are located.
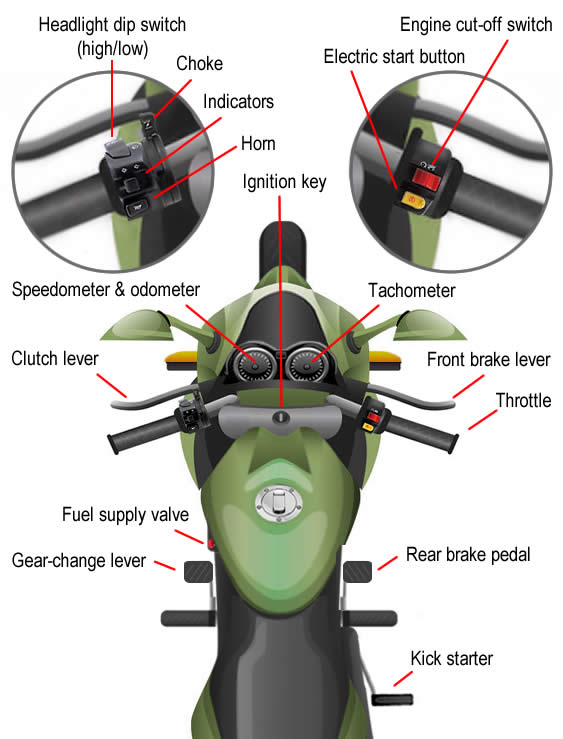
Certain controls and functions are located in the same place regardless of which motorcycle you use. If you’re riding a manual for example, the clutch lever will always be located on the left handlebars. Other controls such as the horn for example may be located in a slightly different location depending on which bike you use. Functions such as the kick starter or tachometer may not be equipped at all. That will be explained below. Let’s start with the left handlebar controls.
Motorcycle Left Handlebar Controls
Essential controls on the left handlebar that you will need to learn are:
- Clutch lever
- Indicators / signals
- Headlight high/low beam dip switch
- Headlight flasher
- Horn
- Choke
Clutch Lever
This lever operates the clutch – available on manual motorcycles only. When the lever is pulled in, the engine disengages power from the rear wheel and when the lever is released, power is restored to the rear wheel. A basic understanding of motorcycle clutch control (finding the bite point) helps to prevent stalling when moving off and stopping, plus how to stop stalling for further reading. Use the clutch to:
- select first gear ready for moving off
- change up and down gears based on engine speed
- prevent the engine from stalling when you stop
- select neutral
Using the Clutch to Change Gears
You can pull the clutch lever in as quickly as you wish, but when releasing the lever, you’ll need a steady, smooth release, particularly when moving off to prevent stalling.
- Using all four fingers of your left hand, squeeze the clutch lever fully to the handlebar until it stops
- Select the required gear
- Release the clutch smoothly
Automatic Motorcycles
Not all motorcycles have a clutch lever. Fully automatic motorcycles have no clutch lever – essentially you twist and go (the throttle) and all gear changing / clutch work is taken care for you automatically. Typically the rear brake lever is fitted in place of the clutch lever. Semi automatic motorcycles also have no clutch lever – you can choose which gear you want and all the clutch work is done automatically for you.
Indicators
Thumb operated switch usually on the left handlebar, though some models of motorcycle may have the left indicator control on the left handlebar and the right indicator control on the right handlebar. Use the indicators to inform other road users when you intend to change direction – a green flashing light illuminates informing you that this control is active (see warning lights). Remember to cancel the signal once you have changed direction – many tests are failed for leaving the signal indicator on for too long after the change of direction has been made.
Headlight Dip Switch
Use your left thumb to operate and switch between main beam (high beam) and low beam (dipped beam). When main beam is on, you’ll usually see a blue warning light on the instrument panel (see warning lights). Main beam is very bright and will dazzle other drivers making it difficult for them to see. At night, switch from main to dipped beam when you see an approaching vehicle or when following vehicles.
Headlight Flasher
Operate the headlight flasher as an alternative to your horn to warn others if you think they haven’t seen you. Use the flasher as a warning if you believe your horn will not be heard.
Horn
Sound your horn to warn other road users if you believe they haven’t seen you. Legally you must not operate your horn:
- between the hours of 11.30 pm and 7.00 am in a built-up area
- when your motorcycle is stationary, unless a moving vehicle poses a danger
Choke
Often older and/or cheaper motorcycles have a choke. A choke is a device that helps when starting a cold engine by changing the amount of air in the air/fuel mixture that is burned by the engine. More modern or more expensive bikes have different system for regulating fuel (fuel injection) and takes care of this fuel mixture for you via an automatic choke. When starting a cold engine:
- move the choke control to the on position
- start the engine
- as the engine warms, you’ll hear it begin to run faster. Slowly move the choke to the off position
It’s important that the choke is returned to the off position once the engine has warmed. Failure to do so can cause the engine to run faster than usual, resulting in vehicle control difficulties, particularity when slowing down. Further, it will also cause increased engine wear, potential overheating issues and an increase in fuel consumption.
Motorcycle Right Handlebar Controls
Essential controls on the right handlebar that you will need to learn are:
- Engine cut-off switch
- Electric start button
- Light switch
- Front brake lever
- Throttle
Engine Cut-off Switch
Operated with the thumb, this switch is also know as the engine kill switch and is only to be used to stop the engine in an emergency. Use the ignition switch rather than the cut-off switch when stopping normally. Because:
- by using the ignition to turn off the engine, you’re much more likely to remember to remove the keys
- leaving the cut-off switch in the off position may result in problems starting the engine later
Electric Start Button
The electric start button is fitted as well as, or in place of the kick starter lever. Before use:
- Ensure the engine cut-off switch is set to the run position
- Switch on the ignition
- Ensure the gear selector is in neutral
- Then press the starter button
Light Switch
On many newer models of bikes, dipped beam is turned on automatically when either the ignition is set to on, or the engine has started. Therefore on these models, there is no need for a light switch as parking lights are illuminated by switching the ignition to ‘park’. On motorcycles that do have a light switch, it is typically found on the right handlebar and is either a simple headlights on/off switch or headlights / parking lights / off switch.
Front Brake Lever
This lever engages the front brake. To operate and to maximise control, use all four fingers and squeeze the lever towards you. The harder you squeeze, the harder the bike brakes. Simply release the lever to disengage the brakes.
Throttle
The throttle or ‘accelerator’ controls the speed of the engine. As you twist the throttle towards you, this increases the amount of air/fuel mixture that enters the engine which in turn increases the speed. The further you twist, the greater the air/fuel mixture enters the engine and the faster it runs. To slow the engine down, twist the throttle away from you. Most throttles spring back to a closed position when released and in this position, the engine run at idle.
Foot Controls
Essential motorcycle foot controls that you will need to learn are:
- Gear selector
- Rear brake pedal
- Kick-start lever
Gear Selector
You will need to change gear in order to match engine power with road speed. Low gears enable you to ride at a slow speed and are also used when moving off, going uphill or when you need to accelerate. As you gain speed, you will need to go up to a higher gear. At higher speeds, higher gears allow for the same engine power to be used, but traveling at a faster speed. Smoothly changing up and down through the gears takes practice to perfect.
The gear selector is typically located to the left-side of the motorcycle just in front of the footrest. If you are operating a scooter or moped, gears may be operated via a twist-grip on the left handlebar.
Every manual transmission motorcycle will have neutral (where no gear is engaged) but the number of gears vary depending on the bike and are selected by lifting up or pushing down the gear selector pedal with your foot. See using motorcycle gears for further reading.
Rear Brake Pedal
This pedal applies the brake to the rear wheel and is usually located to the right side of the motorcycle, just in front of the footrest. On some automatic motorcycles, the rear brake may be located on the left handlebar. To operate the rear brake, simply press with your right foot and remove your foot to release the brake.
Kick-Start Lever
Typically located to the right side of the motorcycle, near the footrest. To operate the kick-start lever:
- Ensure the cut-off switch is set to on
- Switch the ignition to on
- Check that the gear selector is in neutral (the green neutral light will confirm this – see warning lights)
- Fold out the kick-start lever. To do this, you may be required to fold the footrest out of the way.
- Using your foot, exert a good amount of pressure and speed to tread down on the lever. This process may require a few attempts to start the motorcycle.
Instrument Panel and Warning Lights
For an explanation of the motorcycle instrument panel cluster gauges and warning lights, see: