
Motorcycle Emergency Stop Procedure
After completing the module 1 motorcycle cornering and controlled stop, you’ll be required to demonstrate to the examiner the emergency stop, or ’emergency brake’.
This tutorial details not only how the emergency stop is performed on the motorcycle module 1 riding test, but also how the emergency stop procedure should be applied in real-world situations once you have a full motorcycle licence.
The key elements of the emergency stop is to stop as quickly as possible, but to retain full control of the motorcycle. This exercise may take place on a left or right-hand circuit where you are required to reach a speed of at least 50 km/h, which is around 32 mph. You should be okay at 48 or 49 km/h though this will likely incur a minor point.
Your speed will be measured and if you do not obtain a sufficient speed for the exercise, you’ll be asked to try again. Failure to reach a sufficient speed on your second attempt will fail the modular 1 test.
WHAT THE EXAMINER IS LOOKING FOR
This will follow on from the controlled stop and you’ll likely be asked to turn around in the u-turn area. The u-turn has already been completed so you can take as much or as little space as you wish for turning the motorcycle around.

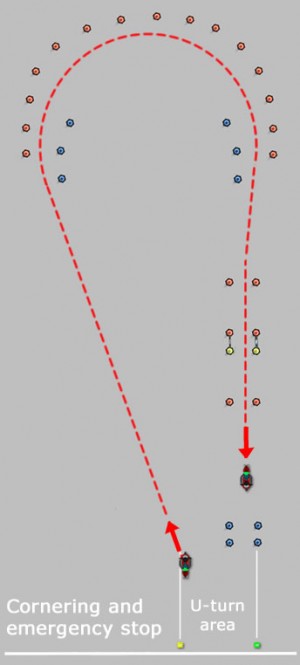
Before moving off from a stationary position, always perform safety checks just as though you were on a public road. (See safety observations in moving off on a motorcycle for further information).
This will follow an almost identical path as the controlled stop previously. Moving off, head towards the top-left corner as before and again, this is based on a right-hand circuit. Second gear should be appropriate for the emergency stop procedure.
This time compared to the controlled stop, you’ll need to ride a little faster, so if you ride around the corner keeping between the blue and red cones at a speed of around 30 km/h (19 mph), this will help you to reach a speed of 50 km/h after exiting the corner.
As you exit the corner, accelerate briskly up to 50 km/h (32 mph) and head towards and keeping between the red and yellow cones.
At this point just shortly after exiting the corner, the examiner will give the signal to emergency brake. This is likely to be a raised right or left hand though the signal used will be explained to you before the exercise.
Braking technique is of course essential during this exercise. The front brake is the most powerful, so apply the front brake first, followed by the rear brake, followed again by the front brake. You’ll need around 75% pressure to the front brake with around 25% to the rear. Don’t grab harshly at the brakes, but use progressive pressure. Remember, you need to stop quickly, so if this is not happening, apply more pressure to the brakes.
If your wheels lock and you skid to a stop, it is likely to fail your test. However, if your wheels lock and you regain control by unlocking the wheels and still stop in the required distance, you should still be good for a pass. See motorcycle braking techniques for further information.
Do not change down gears whilst performing the emergency stop. Engine braking will have little to no impact when braking in an emergency and changing gears will reduce the concentration needed for braking. Just before you stop the motorcycle, bring the clutch in and select first gear.
Remember A, B and C:
- Accelerator off
- Brakes on
- Clutch in
Things to Remember on the Emergency Stop
- Always perform observational safety checks before moving off
- Reach the required minimum speed of 50 km/h (32 mph)
- Upon seeing the emergency brake signal, react swiftly – throttle off but use the brakes progressively, not aggressively.
- Use the front brake first followed by the rear brakes and continue to apply front brake without locking wheels (around 75% front, 25% rear)
- Use all four fingers to apply front brake
- Remember A, B and C
- If wheels begin to lock, release brake to unlock wheels and progressively apply pressure again
- Apply clutch lever to avoid stalling just before stopping
Emergency Stop in the Wet
If you are taking the module 1 test in wet conditions, you’ll still be required to perform the emergency stop, though the test may be cancelled in heavy rain conditions. Your motorcycle is unlikely to stop in the same distance as if the conditions were dry and you cannot use the same braking technique.
Using the same braking technique for the dry will possibly see the front tyre lose traction, lock the wheel and skid. Instead of a 75% and 25% brake distribution, apply a more even pressure to the brakes of around 50% front and 50% rear. The greater stopping distance will be taken into account by the examiner.
Emergency Stop in the Real-World
Braking techniques as outlined above should also be adopted in real-world riding on public roads should you need to. Unfortunately on public roads you’re not going to have an examiner putting his or her hand up to tell you to stop. The most effective stopping procedure in an emergency is to try and prevent it happening in the first instance by forward planning and anticipating the road ahead.