Compulsory Basic Training (CBT) Element B
After the initial introduction into motorcycle compulsory basic training (CBT) and running through the legal and safety formalities, you begin CBT element B.
Element B will now see you getting more hands-on with your motorcycle or moped and will provide you with an introduction to your motorcycle controls and features.
Element B will not involve riding the motorcycle as this element is to enable CBT candidates to gain knowledge on the controls, feel and weight of their motorcycle. By the end of this element you should feel confident on the basic controls, their meanings and how to operate them.
Element B will take approximately 45 minutes to complete, though like other elements, there are no strict time constraints and if an individual requires extra time, this can be allowed for.
Use of Motorcycle Controls
The majority of motorcycles have a manual transmission requiring the rider to change gears. Many of these controls are in a similar position for each motorcycle, though they may vary slightly depending on the make and model of the machine. The feel of the controls also vary.
Two identical models of motorcycles may have a different feel to the controls, all of which can change over mileage of the machine and how it has been used and maintained. It’s important to gain familiarity with the controls and feel of the motorcycle before riding for the first time, even as a rider with more experience. During the CBT element B, your trainer will explain the location, physical application and use for:
Hand Controls
Left and right handlebar controls including the throttle (accelerator), front brake lever, clutch lever, choke, electric starter, engine cut-out switch, light switches (including full beam, headlight dipper and flasher), indicators and horn.
Foot Controls
Rear brake, gear changer and kick starter. Your trainer will allow you to practice the location of all these controls, to understand what they do and to be able to operate them satisfactorily without the need to look down to find them.
Instrument Panel
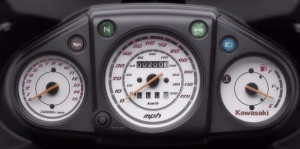
Motorcycle dashboard panel will include speedometer, milometer (odometer) and tripmeter, rev counter, temperature and fuel gauges.

For an explanation of the various gauges and instruments on a motorcycle, see:
Various lights and warning symbols are built into the dashboard instrument panel of modern motorcycles. These are to inform the rider that they may be in neutral, that a utility is active or that there’s a problem with the motorcycle. Your trainer will cover some of these lights and symbols. To view a description of these symbols and their meanings, see:
Motorcycle Safety Checks
You’ll now move onto basic safety checks of your machine to ensure that all is in good order. Safety checks should become a routine for all motorcycle riders and your trainer will inform you of which checks should be made daily and which safety checks can be left for longer periods. During the CBT element B, your trainer will show you the location and how to check for damage and wear of:
- Brakes – to explain the correct operation and application of brakes and to check for signs of wear and to adjust if necessary.
- Steering – to check for any signs of wear and to adjust if necessary.
- Cables – to check for any signs of wear or damage and to adjust or lubricate if necessary.
- Suspension – to check suspension is working correctly.
- Tyres – to check tyres are safe for operation, No cuts or bulges and that they meet the minimum legal requirements to be used on public roads.
- Chain – to check for signs of excessive wear and to ensure it has the correct tension and to adjust if applicable.
- Wheels and spokes – to ensure are in good working order.
- Lights – to ensure headlights, indicators and other lighting is working correctly.
- Fuel and fluid levels – to demonstrate that an understanding of where fluids can be found, their purpose and how to replenish levels.
Motorcycle Stands
Your trainer will explain the different types of motorcycle stands and how to correctly apply them. You be demonstrated how to put a motorcycle on a stand and to take it off and how the surface of a road can affect the balance. For further information and a tutorial on using motorcycle stands, see:
Wheeling and Braking to a Stop
The trainer will demonstrate how to balance the motorcycle, where to hold and how to lean with the machine. You’ll be required to wheel the motorcycle from left to right, probably in and out of cones at a walking pace, keeping balance and control of the vehicle and to look ahead at all times.
You’ll be taught how to effectively stop the motorcycle using the front brake due to the slow speed. Your trainer will demonstrate the correct use and pressure to exert on the brake lever so to stop in a safe and controlled manner.
Starting and Stopping the engine
To finish of the compulsory basic training element B, your trainer will demonstrate the correct procedure for switching on and turning off the engine of your motorcycle. This procedure involves you ensuring the gears are in neutral (check for neutral lamp), to turn on the fuel, to turn on the ignition and deactivate any immobiliser fitted. You’ll now be required to start the engine. this method is determined on whether the motorcycle has an electric starter or a manual kick starter. If your motorcycle is manual, you’ll be advised on how long to use the choke for.
CBT CONTINUED
After the completion of element B, element C will begin. For further reading, see: