Motorcycle Left Turn / Right Turn Procedure
Left and right turns are where you, the motorcyclist is on the major road, intending to turn left or right onto a minor road.
If you on the minor road approaching the major road, this would be a T-junction. For further information on T-junction procedure, see approaching junctions.
During your motorcycle riding test, you will cover many junctions, including left and right turns. There’s good reason for this; you’ll be doing this an awful lot once you have passed the test and statistically, junctions / left / right turns represent the most hazardous road areas for motorcyclists, being the leading location for accidents.
A rider must not only learn a tried and tested method for dealing with left and right turns as detailed below, but it’s also essential that each and every turn is dealt with on an individual basis as all turns vary considerably.
This tutorial covers the correct learning and test procedure for making left and right turns, along with potential hazards that a rider should anticipate when making the turns.
Locating Left and Right Turns
It’s not always obvious to see where a left or right turn is as they can be obscured by parked vehicles, trees, bushes, fences etc. Locating your turn as early as possible allows you to prepare in good time so that you take all necessary precautions. To help you locate a turn, look for:
- Advance road signs informing of a junction ahead
- Road markings
- Gaps in hedges, fences and houses that may indicate a junction to the left or right
Open or Closed?
Consider whether the junction is ‘open’ or ‘closed’ as soon as possible. An ‘open’ junction is where you can visibly see what is going on at the turn and into the road you intend on taking before making the turn. A ‘closed’ junction is the opposite in that the junction and the road you intend on taking is obscured. This can be due to parked vehicles, trees, hedges, fences, or anything else that can obscure your view.
This is an important consideration because a closed junction may have hazards that are unexpected and so may require a slower approach speed. Hazards could be unseen parked vehicles on your exit road, pedestrians crossing on the new road etc.
Motorcycle Left Turn Procedure
This tutorial advises the approach to a left turn, major to minor road, using the OSM PSL routine, along with potential hazards.
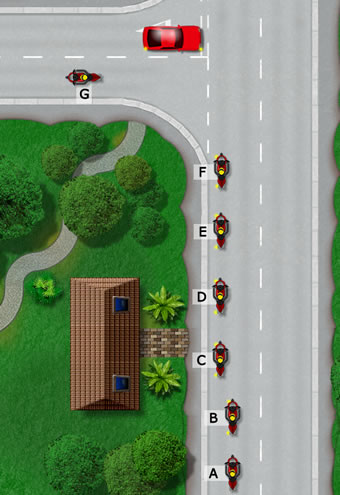
- A – Observation (O) – Check your mirrors and take a quick (lifesaver) look over your left shoulder into the blind spot. Hazards to look out for here are other motorcyclists or cyclists to your left that may come alongside you
- B – Signal (S) – Signal to the left only when you are confident it’s safe to continue with the manoeuvre
- Manoeuvre (M) – Now begins the manoeuvre part of the routine.
- C – Position (P) – Move over and position your bike to the left-side of the road.
- D – Speed (S) – Ease off the throttle and if applicable, select the appropriate gear and begin slowing down.
- E – Assess the junction to determine if it is ‘open’ or ‘closed’ (see above for details). Based on what you see, or lack of, use an appropriate speed.
- F – Look (L) – Look to see if the left turn is free from pedestrians crossing the road. Other hazards can include vehicles parked close to the junction as you round the corner. Be cautious of potholes that can easily destabilise you as you round the corner
- G – Once you have rounded the corner and entered the new minor road, ensure you cancel your signals
MOTORCYCLE Right TURN PROCEDURE
This tutorial advises the approach to a right turn, major to minor road, using the OSM PSL routine, along with potential hazards.
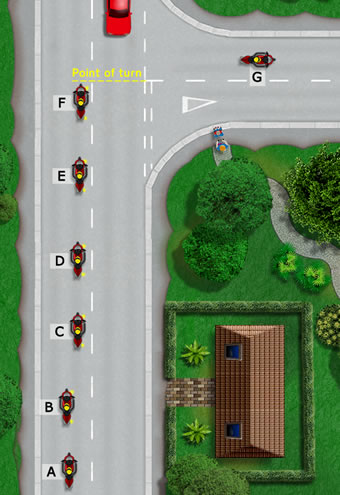
- A – Observation (O) – Check your mirrors and take a brief look over your right shoulder into the blind spot. Hazards to to be aware of are other motorcycle riders coming alongside and cyclists as you slow down
- B – Signal (S) – When you are confident it is safe to carry out the manoeuvre, signal to the right
- Manoeuvre (M) – Now begins the manoeuvre part of the routine.
- C – Position (P) – Position your bike to the right-side of your lane
- D – Speed (S) – Begin slowing down by easing off the throttle and changing down gear if applicable
- E – Look (L) – Look ahead for approaching traffic and judge their speed. If it looks like they’re moving quickly, stop and wait before crossing the road at the point of turn (see below). Look into the road you intend on taking for hazards. Be aware of people crossing the road at the junction and parked cars in the new road.
- F – Point of Turn – It’s important that you do not turn too soon as you may cut the corner, making it hazardous for you and other vehicles exiting the junction and turning too late may see you hit the kerb. Use the point of turn where your front wheel is lined up with the centre of the road you intend on taking for a good turning place. Turn here or stop and wait here for a break in the traffic
- G – Once you have rounded the corner and entered the new minor road, ensure you cancel your signals